1-1 Tuition: December offer

For many years I’ve worked as a teacher alongside my career in the drum & bass scene. I’m now taking on new students for 1-1 production lessons, and until January I’m offering 3 hours of tuition for £100.

If your partner is an aspiring producer this could be a perfect Xmas gift, or you might just wish to take advantage of this offer for yourself and sharpen your skills. All students will receive:

• Feedback on your music from an industry professional
• Bespoke music production lesson (1-1 via Skype) with content tailored directly to your current skill level and your needs
• Three hours tuition for the price of two (must purchase before Jan 2019)
• Lesson arranged at a time and date to suit your schedule – evenings and weekends available
• Optional Gift Certificate to open on Xmas Day

I’m looking forward to helping more people advance their production skills. Email me for bookings and more information:
phil@philthdj.com

IMG_1960

Philth Tips #14 – Mute the drums

I haven’t blogged for a while, but I have been writing an absolute ton of music over the summer while I have a break from my day job at the college. And more than anything I have been focusing on arrangement, making tracks interesting all the way through and avoiding looping/repeating stuff as much as possible. Here is my top tip for writing interesting arrangements:

mute the drums, and focus on everything else in your track….

There are two main reasons why I do this. First, drums are very tiring for your ears. All those transients, and lots of high frequency. As a tinnitus sufferer, I find it is nice to give my ears a rest to avoid them getting fatigued. But the most important reason you should mute your drums is so you can hear what the instruments are actually doing! In DnB the drums are always going to be right at the front of the mix, and they mask a lot of your other sounds. Yes, you need to put the work in and get your drums rocking. But even really good drums do not hold the attention for 5-6 minutes.

Once you mute the drums you get a better understanding of what your instruments are doing, and how they relate to each other. Here’s the challenge: can you make the track interesting and lively all the way through without relying on the energy of the drums?

Switching the drums off forces you to focus on the journey of your track. It doesn’t matter if you are writing the deepest liquid or the hardest neuro, your track should be evolving and keep the listener guessing from start to finish. When the drums and bass are playing it is too easy to just ‘roll it out’ and copy and paste whole 16 bar sections. But why would you just repeat the same section twice? You end up with what is effectively a really long loop, and if you don’t keep the listener on their toes then their brain will habituate and switch off.

Once your drums are muted, start soloing instruments and looking for pairs – two sounds that compliment each other both musically and in terms of frequency. It could be that the two sounds have textures that work well together, or you have found a nice call and response between the two melodies. I will move tracks up and down in the DAW until the pairs are next to each other. And I colour everything so I can see the arrangement more clearly. I think Ableton does this by default, but in Logic you should take a minute to give each sound it’s own colour and it is so much easier to read the arrange window.

When you have identified some pairs, try swapping them around to see how they interact with other parts. Soon you will have a better idea of all the possible combos within your track. I like to have pairs playing for alternate 16s, so that just as the listener has got used to the musical parts in a section, you make a switch and introduce a different combo. For example, a sampled piano with a complimentary pad for the first 16 after the drop, then answered by a strings and keys combo in the alternate 16. By not playing sounds for too long you leave the listener wanting more and encourage them to listen all the way through.

If you get it right you can then combine your pairs with the special element of a vocal or lead melody to really lift your track. Save a few special parts for the last 4 bars of a section and then every 16 and every 32 feels like it builds to a climax. You can also think about the elements in the way a band would – does the piano play during the verses or just the chorus? Let the keys play a solo in the 16 bars before the breakdown. Save your pad for the sections where you want to calm it down.

I put this technique into practice last night, which inspired me to write this article. I had been sent stems for a collaborative project, and once I had loaded the sounds into the right channels in my mix template, I went through the musical parts and looked for pairs. I then added some new parts of my own, and soon I had all the musical elements needed for a full tune. At this point I sketched out the arrangement in full, thinking about how the energy built up and down, some sections are busier and then drop down into a stripped section so it can build up again. You can’t play all your sounds all the time, so think about how they relate to each other and you can develop an arrangement that is progressive.

Screen Shot 2017-08-18 at 03.08.00

I worked for 2-3 hours with no drums. I focused on the journey and had a track that kept me interested and changed enough to avoid the boredom of familiarity. When I finally switched the drums back on it had the desired effect – suddenly the track was full of energy and I was dancing in my chair! But most importantly it held my attention for 5 minutes, and if you’ve ever listened to one of my mixes you’ll know I have a very short attention span.

Give it a try and tell me what you think. Your ears will thank you, and hopefully you will put more focus on the structure and arrangement of your music and keep the listener locked in for your whole track.


Philth Tips #13 – Layering: combining sounds to create a thicker texture

In any form of electronic music, texture is just as important as the notes you are playing. Combining multiple layers can create a thick sound and interesting texture from simple musical ideas.

Pretty basic chords can sound much more exciting if they are played by sounds which fill the frequency spectrum and have some movement. By using EQ we can take the parts that we want from different sounds and mix them to seem like one pad.

Layering Pads.png

This video shows how I use this idea to make a full intro for a DnB track by layering a simple E minor chord with various pads. Please excuse my mumbling, coughing and occasionally covering the microphone. I’ve got a long way to go before I become a Youtube pro!!

Philth Tips #12 – mixing week 7 (creative FX)

I have spent a long time focusing on the fundamentals of mixing. It is vital that the first thing you do is balance your mix properly so that every sound has its own place. It’s only at this point that you can start to think about advanced techniques to bring your mix to life – the creative application of audio plug-ins.

The two main ways that FX can be used creatively:
Spatial FX – change the perceived position of a sound, create an impression of movement, depth, width.
Timbral FX – alter the tone/texture of the sounds in your mix. This can include subtle shifts in timbre and pitch, warped moving textures, thick gritty distortion.


Application of FX

The way you apply FX will great change how they affect the sound – as will the order in which you insert the FX. Audio passes through plug-ins from the top down – this means that the effects happen one after the other, with the signal being changed before it reaches the next plug-in in the chain. If you place EQ in the signal path then the next plug-in only affects the signal that is left after the EQ has been applied. This means you can apply EQ before a reverb for example, and only the frequencies that you desire will be affected by reverberation. Experiment with changing the order of your processing chain, sometimes it can make a massive difference.

In-Line FX – this means the FX is placed directly on the channel/bus and will alter the sound totally before it leaves the channel. In-line processing fundamentally changes a sound.
Parallel Processing – the FX is placed on a bus and aux sends are used to decide how much of the original signal to send to the bus. This means that the original signal plays unimpeded, with the option to decide how much signal goes to your FX, and how loud the affected signal is in your mix. You can then also apply multiple plug-ins to your Aux track without affecting the original signal, and you can also choose to place it in a different place in the stereo field – for example, a delay that only plays on the left.
Automation – you can use track automation to choose when and where to apply your FX. This could by using Bypass or Wet/Dry controls to selectively switch on your FX; automating an Aux Send level; automating the behaviour of the aux track itself.


Spatial FX

Creative FX 2 - spatial.png

Reverb – use reverb to manipulate depth. Automate reverb to suddenly push a sound into a new space.
Delay – very short delays further manipulate the impression of depth.
Delay can be used to thicken a sound. And of course, create the repeating ‘echo’ effect.
Stereo Imaging – these plugins take advance of psychoacoustics to manipulate phase. By altering the phase relationship in a sound it tricks the brain into hearing a ‘wider’ sound – but also means you will have phase problems in mono, so be careful.
Panning automation – move sounds around the stereo field to emphasise changes in the song.
Chorus/Modulation – chorus creates a double of a signal then delay it by a very short amount to manipulates phase. Other modulation plug-ins such as phasers apply similar principles to create a sound that appears to be moving.


Timbral FX

Creative FX 3 - timbral.png

Modulation – modulation plug-ins (phaser, chorus, flanger, ringshifter etc) also alter the frequency balance of a sound. This can range from a subtle thickening effect, right through to whooshing and swirling textures. Don’t worry about how they work (I don’t!) just try them out and see what interesting things they do to your audio. For example I like to use Logic’s ringshifter on the top layer of reece basses, to give the tops some movement that feels alive due to the randomness caused by the ringshifter.
Distortion – gentle saturation (for example Overdrive, Tube Distortion) thickens a sound by emphasising its natural harmonics – this is known as harmonic distortion. The other end of the scale is the fizzing, gritty, buzzing, screaming sound of hard distortion.
Amp Simulation – model the behaviour of a guitar amplifier to create a range of tones. Again this can range from subtle thickness to painful screaming tones.
EQ/Filters – we have used EQ to balance our levels. Automating EQ or filters enables us to choose to highlight sounds at important moments in a song.
Pitch – layer vocals for thickness, warp the pitch for dramatic effect.

When using these types of FX start off with presets so you can get an idea of the possibilities available to you. Give yourself an idea of how you can manipulate audio creatively, and bring your mixes to life.

Philth Tips #11 – mixing week 6 (dynamics – part 2)

Last week we looked at dynamics processors, in particular compressors. This week we will add some new tools, and consider how we can apply dynamics processing to groups of sounds.

 
Dynamics processors

Transient shaping – shape the Attack (the transient) and Release (the tail) of a sound. Particularly effective with drums to make them more pokey or tighter.

Noise gate – used to cut background sounds. The gate will only open when the signal goes over the threshold, so only the loud parts of a track pass through the gate. Very effective on live drums to remove the noisy background in between hits.

Saturation – using Overdrive and similar plugins will limit your sounds and also create harmonic distortion. This effectively makes things sounds thicker and fatter.

Limiting – stops signal going over 0db and clipping the channel. However be careful as running into a Limiter too hot will still cause distortion.

Clipping – some compressors have built-in Distortion. This enables you to clip the signal and squeeze it up to appear louder without leaving spiky transients.

 
Applications of compression

Buss compression
Using a compressor on a buss group will help to hold all the sounds together by reducing their dynamics and shaping their transients as a group rather than individually. For example – compressing layers of vocals to avoid sudden peaks; compressing all of your drums as a group to avoid peaks and also potentially make your drums pump. This is why people refer to buss compression as ‘glue’, sticking groups of sounds together.

To use this technique you simply need to route all your drums/vox/etc directly into a Bus track instead of going straight to the stereo output. Then when you apply plugins to this Bus they affect all of the incoming audio at the same time. Now a compressor will respond to your entire drum mix. You can setup the compressor to emphasise transients, to reduce dynamic range, to cut off any peaks…. all of the normal uses of compression but applied to your whole drum mix, processing it all together.

This also means you can apply Saturation or Limiting (or even both) at the end of your chain, which will cut off any peaks and recover some headroom. Then you can push your drums up so they appear louder in the mix without using up all of your headroom. My absolute favourite tool for this is Camel Phat at the end of the drum chain to give the drums an extra squeeze.

 
Parallel compression
This technique involves mixing a heavily compressed signal back into the original dry signal. Most commonly used on drums (for extra impact and energy) and vocals (solid signal with the impression of dynamic range).
Set up an auxiliary channel and use aux sends to choose which signals are routed to the compressor. You can then apply aggressive compression to your signal (no dynamics on vocals/exaggerated pumping drums) and use the aux fader to mix this signal with your dry signal. I normally set up a final bus to group the dry and parallel signals together for a final bit of control.

When writing DnB I use parallel compression on my drums in a variety of ways, depending on the style of track.
For minimal or techy tracks I will push the compressor on the parallel chain to emphasise transients (hard compression, Attack/Release set to let the drums poke before they are compressed), I will then double the effect by using an Enveloper to cut the tails and push the initial attack. When you mix this back into your original drum mix you end with a very tight and snappy sound, spiky drums.
For liquid I will often go in a completely different direction, and use the parallel compression to bring out the shuffles of my breakbeats by having a very short attack then timing the release to let the shuffles jump out. Using the Soft Clipping feature in the Logic compressor will squeeze the drums more and result in the shuffles appearing to pop out of the drum mix. This can then be mixed with the dry signal to achieve a swinging or pumping effect.

Dynamics - parallel compression

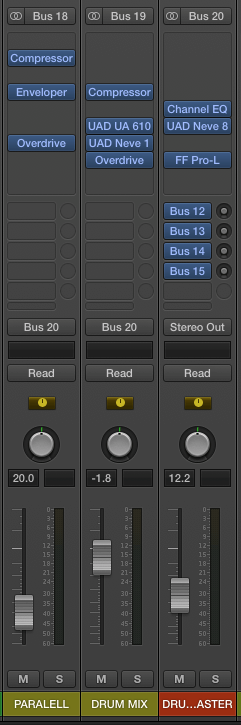
This first screenshot shows how the two drum busses are mixed into a final drum bus. This Drum Master channel makes it very easy to adjust the volume of the drums in relation to the rest of your mixdown.

The Parallel is compressed aggressively, with a fast attack and release to ensure all transients have a POP. The Enveloper is pushing the first 10-20ms of the transients to bring out more poke, which is then clipped with the Overdrive.

The Drum Mix is compressed gently, a little squeeze after letting the first 50-60ms punch. Then the UAD plugins are a Tube Amp for saturation, a Neve EQ which is bringing up the bass of the kick with a low-shelf, and finally, Overdrive to catch peaks and squeeze a bit more.

On the Drum Master there is EQ on the whole drum mix, in this instance to push the mids, and finally Limiting to push up the perceived volume while avoiding any peaks.The result is the brick wall of drums you will see below.

In this second screenshot, you see the effect that each stage of processing has on the audio. The end result is thick fat drums that are controlled by the Limiter.

Dynamics - processing drums.png


Philth Tips #6 – mixing week 2 (stereo field)

Each sound in your mix wants to have its own space. By making use of the stereo field you create a bigger sounding mix through the use of width, and you also free up space in the centre for your most important music element (vox/melody). Even if you are writing dance music tracks, where the bass and drums are massively important, you still need something melodic or a hook for listeners to remember. Using the stereo field properly can make space for this key element to cut through your mix.

Your kick, bass, and the main punch of your snare should all be mono. These sounds need to be strong, and panning will make them lopsided. As a general rule, everything below 200-300hz should be mono to ensure your bottom end is focused and powerful. But every other part of your track could benefit from panning to help create space in your mixdown.

Consider: what sounds are in your mix, when do they play (which sections), and what is their significance? Write a plan and consider how to use the stereo field to drive the song along. Decide what is the most important element in your track, and leave it in the centre. Pan the other elements of your track to free space in the centre, then your vocal/hook can cut through easily.

A good mixdown draws the listener’s attention to the important sounds in a track, and this will change in each section of your song. You can manipulate the stereo field to drive the song along and provoke a more powerful emotional response in the listener.

Manipulation of the stereo field

  • Central verse / Wide chorus is a commonly used technique in pop music. It gives the listener an emotional payoff when the song appears to get bigger at the chorus.
  • Wide breakdown / Central drop is a common dance/bass music technique. A wide breakdown helps build excitement then all the power of the drop is focused centrally for maximum impact.
  • LCR technique – all sounds are either hard panned or central. This completely clears the centre of the mix for vocals. Most suited to rock/band mixes, but you can use this method to less extreme settings and clear the centre of your mix for one special element

Make some of your stereo tracks mono before panning (for example Logic orchestral instruments, pads, guitars). It will concentrate each sound in one place, and make better use of the stereo field. You don’t want to fill up the stereo field and leave no spaces for other instruments.

Be very careful when using stereo width plugins. They achieve a false sense of width by manipulating phase relationships – so your mix will possibly collapse in mono. Be particularly careful with drums, vocals, and your master channel. Stereo wideners can ruin all the power of your mix. You don’t need to use a stereo widener on your master channel if your mixdown makes proper use of the stereo field.

Always check your mix in mono to make sure your volume balance is still right – do not rely solely on using the stereo field as many playback devices will convert your mix to mono. Volume balance is still the key, then the stereo field helps to achieve separation.

stereo-field-screenshot


Philth Tips #5 – mixing week 1 (volume)

I work as a college teacher from Weds-Fri, teaching Music Production. On Friday I teach my Yr 2 students in the studio, and this point of the year we start looking at mixing. That means my blog posts on my website are going to get steadily more techy over the next few months. Each week I am going to post the contents of my lesson on here, in a series of blog post covering mixing from the very basics. First up – volume.


Write a mix hierarchy – what is in your song, and what is the most important element?

What is the focal point of your song at each section of the track? Your track needs something memorable for the listener, something to give the track a sense of identity. This should be the loudest element in your mix, and bear in mind this will change in each section. In a traditional song, the focal point is almost always going to be the vocal, in dance music your bass is going to take up a large amount of headroom but there needs to be another melodic element/hook that takes centre stage. If the loudest part of your mix is the drums then the other parts of the track are going to be subdued.

I will actually write this down on paper – a list of all the elements in my track, the role they play (melody, harmony, atmosphere etc) to help me to decide what is the most important. It is very easy to get accustomed to the sound of a track you have been writing for months, sometimes you need to apporach it from a fresh perspective. And sometimes it can really help to push all your faders down to 0 and start again.


Gain structure – keeping volumes down at the channel stage.

You do not want to be clipping at any stage of your mix, and in the modern DAW environment there is really no reason to go anywhere near 0db. If you find you are running out of headroom, select all of your tracks and pull them all down together, this retains your mix balance but will create lots of headroom just by a 2db adjustment.


Make bus groups for each set of sounds

This makes it easy to control volume of whole groups. For example, a drum bus lets you mix the whole drum group to the appropriate level in your track and process all of your drums together. Group your strings, pianos, pads, vocals, mid-basses… once you have got the balance of your individual tracks right you can then use the bus groups to adjust the overall balance of your mix quickly.


HEADROOM!

Leave some space in the track – your master volume shouldn’t go above -3db. If you have left headroom then once you have decided on your focal point it is easy for your loudest sounds to poke up into the space and grab the listener’s attention.


Analyser/Meters

Trust your ears, but learn to use the meters to check that you do not have a lopsided mix. This is especially important if you are working in a home studio or on headphones and you don’t have great bass response. Watch your favourite tracks in your analyser to get an idea for relative bass/top end levels. You are not trying to match the levels of a mastered track, don’t try to smash your bass up to the same point as a Break mixdown, but you do want to learn about the relative balance of a good mix.


Philth Tips #1 – Stop listening to drum & bass!

This might seem like a ridiculous tip coming from a DnB DJ/producer, but I’m not telling you to give up on the genre and go and listen to techno… This tip is aimed at helping producers to avoid getting caught in the trap of listening to so much DnB and suddenly running out of original ideas.

As a producer who is learning, of course you need to be aware of what is happening in the scene, but it shouldn’t be the only influence going in to your music. If you spend your free time listening to DnB then it is impossible not to be directly influenced by it, and you’ll find that that your music inevitably just sounds like a copy of the latest banger. This used to happen to me all the time, I would check loads of new releases on my journeys back and forth around London and then when I got into the studio all I had in my head was other people’s music.

This can happen whatever sub-genre you are into; listening to a load of Dawn Wall will send you into the studio searching for euphoric samples and rolling beats, listening to DLR all day is a sure fire way to end up getting stuck in a loop trying to match his funky basslines, trying to match Break’s drums will never make you feel good, and a day listening to Noisia will just make you depressed and not want to write music! Even if the influence is just sub-concious (and it often is) you will still end up mimicking the artists you love and who inspire you to make drum & bass.

I’m not saying you should cut yourself off from the scene, and of course it is important for DJ’s to be up to date so it impossible to cut DnB out of your diet entirely – but it is possible to manage your time and let those promo emails stack up for a while. In a period of trying to write new music it isn’t healthy to spend loads of time listening to all the new releases in the search for inspiration. The great thing about jungle and early DnB is you could tell what other styles of music a producer was into through the samples they chose to use. As well as just the samples, its the influence and mood from other styles that can have a massive effect on what you write, and it is much more interesting to take influences from other styles and bring them back into a DnB context.

When I’m focused on writing new music I listen to anything other than DnB. Often a lot of funk and soul in the mornings, and tonnes of ambient music, soundscapes and film scores. I find Spotify is a great tool for doing this, it exposes me to a huge range of artists that I wouldn’t hear otherwise. Every week I find a new composer who blows me away. Sometimes the killer sample just arrives through a search for new music, but more often it is the overall vibe and palette of sounds that provides the spark of inspiration to write some original DnB. Bringing these different influences back into my music helps me to create something with more depth. Of course the drum and the bass themselves are still the essential elements, but I try not to get bogged down worrying about making them sound like somebody else. I concentrate on the overall vibe of the song and then engineer the beats and bass to suit my vision.

Here is a collection of music I have been building over the last year, there’s no real method to the curation of this playlist it’s just things that have caught my ear and I want to hear again. Listening to this playlist so many times on my travels is giving me a whole library of ideas to draw upon when it’s time to get back in the studio….

Phil’s Top Tips! #1

How to improve your kick drums and give them more weight:

1) Take two portabello mushrooms. Fry the bottom gently.
2) Place in an oven tray. Add three different cheeses in a pretty pattern. Cook under the grill for 5-7 minutes.
3) Sample your kick drums from tunes that have been professionally mixed and mastered.
4) Eat mushrooms while listening to your amazing fat new kick!

20130929-105558.jpg