I’ve spent the last few weeks working on my 2016 End Of Year Mix; first choosing the tracks, working out the running order, exporting to USB’s, then actually mixing it (it took me 3 shifts because I had to stop for food a few times). The final step is giving the mix a rough master before it goes online. And I do mean rough – this should not be interpreted as a guide to mastering your own music, pay a professional to do that. But you want your DJ mixes to sound good right? The following steps will help you to balance the levels and squeeze the mix up a bit louder.
At the risk of being patronising – watch the levels when you record your mix!! If you are smashing tracks in at wildly different volumes then it is impossible to level your mix later without major surgery. Give yourself some headroom when you record, and watch the input level as you record into Logic, Audacity, whatever you use, to make sure your gains aren’t creeping up.
You also need to bring down the volume faders if you have got two tunes dropped together or you are going to make peaks and troughs every time you double-drop, and end up with one track sounding quiet when you play it solo. Finally, don’t play two basslines on top of each other because that will: a) double the volume; b) sound like shit when the subs clash.
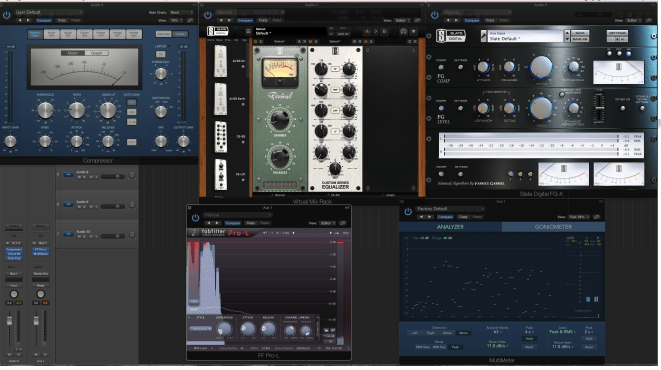
Now your mix is recorded and ready for mastering. Do the basic trimming so you haven’t got any silence at the start and finish. Now it’s time to do some processing. My examples will all be in Logic, but the principles are the same, you need a compressor, EQ, a limiter and a spectrum analyser.
Compression will enable you to level out the mix, bringing down the level of the loudest parts. I use the standard Logic compressor. As a very very basic guide to the functions of a compressor:the Threshold is the volume level that will trigger the compressor, the Ratio is how hard it will compress (reduce) the signal, the Attack is how quickly the compressor will react, and the Release is how quickly it lets go once the level goes below the Threshold.
If you want to stop any peaks completely then set the Attack as low as it can go. and then carefully bring down the Threshold so the compressor only responds to the loudest tracks in your set. You don’t need to compress the tracks that are playing quietly, you just want to catch the bits where you got excited and went too loud. You can now use the Ratio to determine how heavily the signal is compressed. A higher ratio will mean that the level of the louder parts of your mix is reduced more. This comes back to your recording itself, if you have been consistent with your gains then the compressor won’t need to do so much work.
Depending on your compressor of choice this quick attack time can completely remove any spikes, and now you can set the Release of your compressor to determine how quickly it lets go. Too short and you are going to hear the compressor pump in and out. A longer release time will mean that once the input goes too loud, the volume level will be held down for long enough that you don’t really hear it come back up, it just happens naturally when the music lets it. When you are mixing down your music the release time is vital to making your compressor dance with the music. For a DJ set it is better that you don’t hear the compressor moving, so err towards a long release.
I hope this makes sense so far. The idea is simple, set your compressor so it only reacts to the bits of your mix that have gone too loud, and then it pulls these loud parts down by the appropriate amount to keep your DJ mix at a consistent level. You don’t actually want to heat the compressor working so use the Attack and Release until the effect is transparent.
Next is EQ. And to be honest I find myself doing less and less EQ to my DJ sets – the tracks have already been mixed and mastered and my job as a DJ is to use the controls of my mixer to keep the sounds balanced. A good mix doesn’t need loads of EQ. If you are working from a live set sometimes it needs more work, especially if the monitoring wasn’t great or if you have a vocalist that is too loud. But for a standard studio mix I will often just use something like Slate’s Revival to give a little bit of extra roundness to the bottom end, and if it is a vinyl mix then a healthy boost in the top end.
Once upon a time I would obsess over getting all my tracks to be level in terms of their frequency balance. This is where your Spectral Analyser comes in, set it up so you are metering the mastering output, and then you can see how much bass, mids, tops is playing at any one time. You can then automate EQ for tracks that really need it, and in this case I would just use a high or low shelf EQ to bring up a wide area while one particular track played. But as I said, nowadays I mainly avoid doing this. I try to stay on top of the Eq while mixing and then if there are slight differences that’s just how the songs sound!
At this point you should have a mix that is balanced in terms of volume and also frequency. The final step is to make it LOUD so get a limiter and push the threshold/gain up until your mix is hitting 0db consistently. If you were mastering a song then you need to think carefully about the Attack and Release of your limiter, but we already established that we will pay a professional for that.
I’ll be honest, I smash my DJ mixes until they are silly loud, there will be no headroom at all on any of the drops, but then I ease off enough that I’m not crushing the breakdowns and there is no audible clipping. If you push the limiter too hard you will start to hear things like vocals and strings distorting. Calm down mate. Ease back.
Bounce your mix to mp3, 320kbps for best quality, 192 0r 128 if it is going straight onto the web to stream. With Logic you can also add ID3 tags, so add a link to your website, Facebook page etc. A top tip is to add some jingles at the start because that seems to stop the Soundcloud police from taking your mix down. Ask a mate who is an MC to do a short jingle/ident for your mixes and layer it over your set in Logic.
The final step for me is to add some artwork, and with iTunes it is easy to embed the artwork onto the file. If you want a guide to making artwork I’m definitely not your man. I have got about a hundred photos of me playing out wearing checked shirts (thanks Apps!) and I have just about worked out how to paste a logo on top of a photo using Preview in OSX. Skillz.
My 2016 End of Year Mix is done, mastered, tracklisted, and has been sent off for an upcoming feature. Watch this space.